To install LAMP (Linux, Apache, MySQL, PHP) on an AWS Ubuntu server, you can follow these step-by-step instructions:
Connect to your AWS Ubuntu server using SSH.
Update the package list by running the command:
|
1 |
sudo apt-get update |
Install Apache web server by running the command:
|
1 |
sudo apt-get install apache2 |
Once Apache is installed, start the service and enable it to start at boot time by running the following commands:
|
1 2 |
sudo systemctl start apache2 sudo systemctl enable apache2 |
Verify that Apache is running by opening a web browser and entering your server’s public IP address in the address bar. You should see the Apache default page.
Install MySQL server by running the command:
|
1 |
sudo apt-get install mysql-server |
During the installation, you’ll be prompted to set the root password for MySQL. Choose a strong password and remember it.
Once MySQL is installed, start the service and enable it to start at boot time by running the following commands:
|
1 2 |
sudo systemctl start mysql sudo systemctl enable mysql |
This is an optional step and will allow the root MySQL user to login through phpMyAdmin.
|
1 |
sudo mysql |
Change authentication method for the root account to mysql_native_password by executing the following query.
|
1 |
ALTER USER 'root'@'localhost' IDENTIFIED WITH 'mysql_native_password' BY 'password'; |
Replace password by the root password you entered while installing MySQL.
To put the changes into effect, execute the following query :
|
1 |
FLUSH PRIVILEGES; |
Following this, we can now do a root login through phpMyAdmin. The username is root and password is the one that was setup earlier while installing MySQL.
Return back to the command line.
|
1 |
exit |
Secure your MySQL installation by running the command:
|
1 |
sudo mysql_secure_installation |
- In the next screen we will be asked whether we need to setup VALIDATE PASSWORD plugin. We selected no.
- Set the password for the root MySql account.
- Remove anonymous users? We selected yes.
- Disallow root login remotely? We selected no.
- Remove test database and access to it? We chose yes.
- Reload privilege tables now? We again chose yes.
This will prompt you to configure some basic security settings for MySQL.
Install PHP and some common PHP modules by running the command:
|
1 |
sudo apt-get install php libapache2-mod-php php-mysql php-xmlrpc php-soap php-curl php-gd php-xml php-cli php-bcmath php-tokenizer php-pear php-curl php-memcached php-xdebug php-intl php-fpm php-pgsql php-imap php-json php-zip php-mbstring |
Once PHP is installed, restart Apache for the changes to take effect by running the command:
|
1 |
sudo systemctl restart apache2 |
Create a test PHP file to verify that PHP is working correctly. Create a file called info.php in the document root of your web server (/var/www/html/) with the following contents:
|
1 |
cd /var/www/html/ |
|
1 |
sudo nano /var/www/html/info.php |
|
1 2 3 |
<?php phpinfo(); ?> |
Paste the key and hit “ctrl-x”, hit “y” to save and “enter” to exit
Save the file and navigate to http://your_server_ip/info.php in a web browser. You should see a page displaying information about your PHP installation.
That’s it! You’ve now installed LAMP on your AWS Ubuntu server.
Optionally, you can also install some additional PHP modules that you may need for your web application. You can search for available PHP modules by running the command:
|
1 |
sudo apt-cache search php-* |
For example, if you need the PHP GD module, you can install it by running the command:
|
1 |
sudo apt-get install php-gd |
If you want to host multiple websites on your server, you’ll need to create separate directories in /var/www/html for each website and configure Apache virtual hosts. To create a new virtual host, create a new configuration file in the /etc/apache2/sites-available directory. For example, create a file called mywebsite.conf with the following contents:
|
1 2 3 4 5 6 7 8 9 10 11 12 13 |
<VirtualHost *:80> ServerAdmin webmaster@mywebsite.com ServerName mywebsite.com ServerAlias www.mywebsite.com DocumentRoot /var/www/html/mywebsite <Directory /var/www/html/mywebsite/> AllowOverride All Require all granted Allow from all </Directory> ErrorLog ${APACHE_LOG_DIR}/mywebsite_error.log CustomLog ${APACHE_LOG_DIR}/mywebsite_access.log combined </VirtualHost> |
Replace mywebsite.com and www.mywebsite.com with your actual domain names, and /var/www/html/mywebsite with the path to your website’s root directory. Then, enable the virtual host by running the command:
|
1 |
sudo a2ensite mywebsite.conf |
Finally, restart Apache for the changes to take effect by running the command:
|
1 |
sudo systemctl restart apache2 |
Your new virtual host should now be accessible via its domain name.
That’s the complete process of installing LAMP on an AWS Ubuntu server, and you can now start deploying your web applications on your server.
To access MySQL database from PHP code, you can use the MySQLi or PDO extension. For example, to connect to a MySQL database using MySQLi, you can use the following code:
|
1 2 3 4 5 6 7 8 9 10 11 12 13 14 15 |
<?php $servername = "localhost"; $username = "root"; $password = "your_mysql_root_password"; $dbname = "your_database_name"; // Create connection $conn = new mysqli($servername, $username, $password, $dbname); // Check connection if ($conn->connect_error) { die("Connection failed: " . $conn->connect_error); } echo "Connected successfully"; ?> |
Replace “your_mysql_root_password” and “your_database_name” with your actual MySQL root password and database name, respectively.
To manage your MySQL databases and users, you can use the MySQL command line tool or a graphical user interface such as phpMyAdmin. To install phpMyAdmin, run the command:
|
1 |
sudo apt-get install phpmyadmin |
During the installation, you’ll be prompted to configure some basic settings for phpMyAdmin, such as the web server to use and the database administrator password. Once installed, you can access phpMyAdmin by navigating to http://your_server_ip/phpmyadmin in a web browser.
Finally, to keep your LAMP stack up-to-date and secure, you should regularly update your Ubuntu packages and LAMP components using the following commands:
|
1 2 3 |
sudo apt-get update sudo apt-get upgrade sudo apt-get autoremove |
You should also configure a firewall to restrict incoming traffic to your server and set up backups to protect your data in case of a disaster.
That’s it! You now have a fully functional LAMP stack running on your AWS Ubuntu server.
Note:
To be able to upload files using FileZilla we need to change the ownership and access modes of the server directory.
|
1 2 |
sudo chown -R ubuntu /var/www/html sudo chmod -R 755 /var/www/html |
|
1 |
sudo chown -R 777 /var/www/html |
|
1 |
sudo chown www-data:www-data -R /var/www/html |
|
1 |
sudo apt install zip unzip |
any file unzip projectname.zip
|
1 |
unzip projectname.zip |
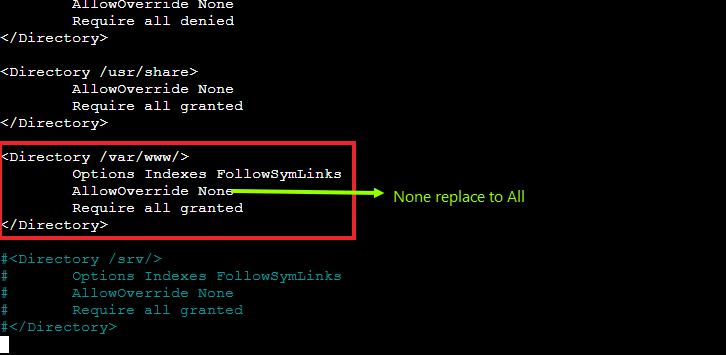
When php file not then follow this process
|
1 2 3 |
sudo nano /etc/apache2/apache2.conf sudo a2enmod rewrite sudo service apache2 restart |